Backstory: A few days ago, I did a deep exploration of stock photography companies by exploring their compensation structure, content requirements, and others’ reviews (see here). Afterwards, I felt like I had a pretty decent grasp of the process, so I thought I would start digging through some photos that I could possibly submit and give it a shot.
Submission Process
Deciding on images: I narrowed down my potential list of photos to about twenty images and then carefully looked over the quality (full description from Shutterstock here):
Images were at least 1200 x 3000 pixels
In JPEG format
Editing: Next, I needed make some basic minor corrections, like white balance and adjusting highlights and shadows. Because I’m not an expert in photography and because this is just a side gig, I decided that it doesn’t make financial sense for me to pay for Adobe Lightroom, although I would love an excuse to purchase the software–Readers: Adobe is not paying me for advertising. Adobe: if you want to pay me to advertise, I’m willing to discuss the terms ^_^. Instead, I went with Rawtherapee, which is free. There are others out there, but I felt that this was the closest to Lightroom and there were some pretty thorough tutorials on how to use the software to inspect and edit my photos (YouTube tutorials: 1, 2). After editing my photos and inspecting them, I narrowed my selection down to 10 potential submissions.
Selecting Photos to submit: My decision process was driven by image quality (e.g., chromatic aberration; lens flare) and whether or not I could imagine an application for the photos. It’s helpful to ask yourself, “Who would use this photo and where and why?” Truthfully, the latter exercise filled me with a lot of doubt because I think it’s probably stronger to have photos with models acting out a concept like “success” or “using technology.” I got over it though because really, this is something I can keep in mind in the future when I’m taking more photos. Right now, it’s more about learning how to edit my photos and figuring out how to navigate the submission portal.
Submission Guidelines: After deciding which photos I was going to submit, I reviewed the guidelines and signed up with Shutterstock as a contributor. If you’re interested in signing up, I hope you consider showing some love and using my referral link–Full Disclosure: I would earn $0.04 for every image that someone downloads from Shutterstock, which is not taken from your earnings, for the first two years after you sign up (more details here).
Signing up and submitting for review: Signing up was simple. You provide an email and password; update your profile information; update your tax information; and then upload your photos. You have to tag your photos with keywords and provide a description of the photos after you’ve uploaded them. Shutterstock will make some keyword suggestions for you based on your image. I also found it helpful to look through a thesaurus for related words and to look through similar pictures and see how they tagged their photos. Next, you can submit. You should get an email confirming that you’ve uploaded photos and they will be reviewed shortly. I read around on the web that this could take a couple of days but mine were reviewed and approved within less than 24 hours! Impressively fast!
One thing you may experience is not knowing what to do next once you’re approved. Your photos won’t immediately appear in your portfolio, so if you’re like me, you may wonder if that means you have to re-upload those photos because that was just a review process and now you’re free to set up your portfolio. DON’T DO THAT. Digging through their forum, I saw that others had similar questions and were advised to wait. It may take another few days for the photos that were approved to show up in your portfolio. Again, this took less than a day for me.
Rejections: I did have one photo that was rejected:
he message said that it was rejected because I didn’t submit a model release form. I’m still a little puzzled by this because I thought that this image fits with their description of “silhouette of a unrecognized person.” It looks like I can resubmit it though with a model release form pretty easily. They even provide templates that you can use.
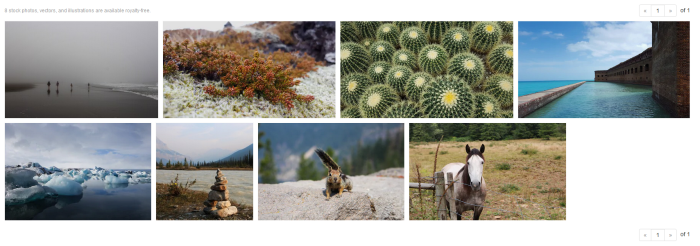
Your Portfolio: After reviewing reasons for rejections, if any, you can upload more photos for review and start sharing your portfolio. Here’s a screen shot of my portfolio so far:
Yay!
Conclusion
All in all, the process was super easy and way faster than I thought! I’m also pretty excited that basically all of my photos were approved–minus the one because of the model release form, but at least it wasn’t rejected on technical aspects! Now, I have to wait and see if anyone actually buys one of my photos. I should probably learn more about search rankings on Shutterstock in the meantime. I’ll share any updates and what I learn in a future post. I’ll also likely try submitting to other sites so that I can compare the process and hopefully my earnings. I’ll share details about that too.
When I was learning about web design, I would commonly come across tips about choosing good stock photos–the (often generic) images that you commonly come across on nearly every website you visit, magazine you read, advertisements you see, etc. I couldn’t help but wonder if this would be a nice side hustle since I have a mid-level DSLR (Canon Rebel T series). BTW, stock image sites also offer different types of media other than photos, like illustrations/vector images, video, and audio. I’m just covering photography in this post. I’ll cover some of the others in the future.
Before I get into how much you can make, it’s probably best to go use cases for stock images. If you are familiar with the content that is sold on stock image sites, then go ahead and skip to the next section.
Primary Types of Usage
Public Domain: Free (non-exclusive) commercial or personal use without a license
Royalty-Free: Copyright license for use without restrictions after paying a one-time fee and/or agreeing to certain use-terms.
Rights-Managed: Copyright license for a specific, one-time use. Additional licenses can be obtained for multiple applications, but still may come with the right for exclusive use.
Creative License: Used for promotional cases.
Editorial License: Used for anything non-commercial like a blog or presentation.
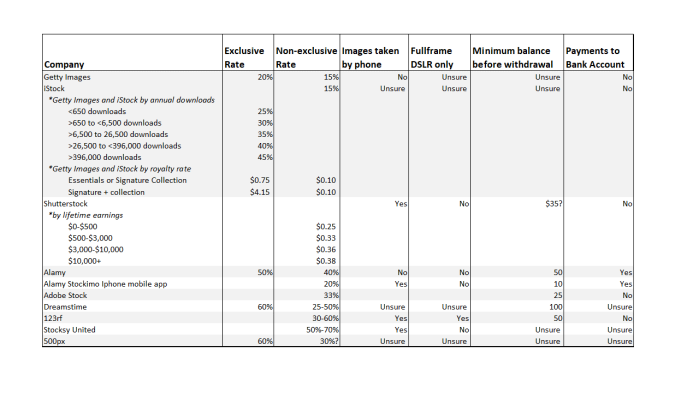
Summary of Requirements and Compensation of Images by Company
I created a table to summarize compensation rates/amounts by company and whether they allow you to submit images that were taken by your phone. A lot of these sites require that you meet a minimum sales balance before you can withdraw your earnings, so I included that information too. Lastly, many of the sites will not directly deposit your earnings into your bank account. I think that’s useful information to know so I added a column for that as well.
Detailed Discussion of Requirements and Compensation by Company
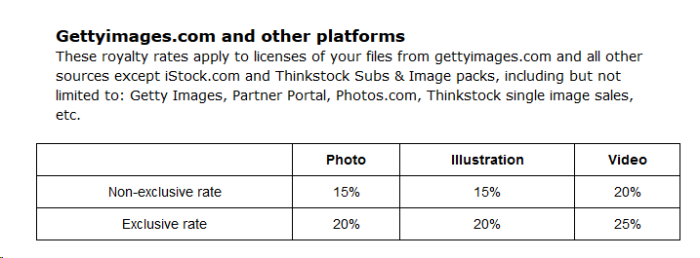
Both are owned by the same company but Getty Images is much more strict about the photos they accept. Accordingly, the payment you can receive from Getty Images is higher than what you can receive from iStock, especially because Getty charges the buyer more for their purchases ($150+).
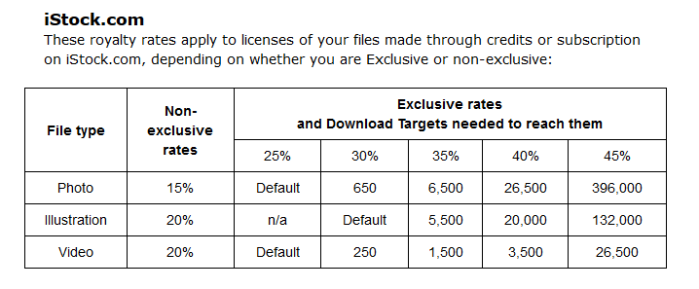
Although you earn a higher percentage through sales from exclusive contributions (photos that you sell to exclusively to Getty or one of its accepted subsidies and no other stock photo site), the royalty rate you receive is ultimately determined by the number of times your content is downloaded/purchased and whether the purchaser has a subscription. This is calculated on a monthly bases.
Getty images has a reputation for having high quality images though, so their standards, and therefore their rejection rates, are also high. You’ll need a high-end DSLR to consider submitting, which means it’s not even an option for me. It’s definitely a great place to aim for maybe sometime in the future.
iStock on the otherhand, is mostly a microstock service–selling royalty free images–so they charge the buyer less for their purchased content. Their photos sell for around $12 each, which means you’ll earn less than $2 per download for non-exclusive content–and that’s only if the buyer did not have a subscription. If the download is from a subscription customer, you’ll earn between $0.20-$0.50 per download.
Both sites require that your images are in JPEG format and no larger than 3GB. I am not sure if they accept photos taken by a mobile phone or if you have to submit photos produced by a full-frame DSLR. The website does say that your compensation partly depends on file size.
One other thing you should know is that you have to pass a quiz in order to submit your work to iStock and Getty. It seems pretty simple though (see quiz discussed in another blog). Also, you have to apply to submit photos to Getty and iStock. It takes about 30 business days. If you’re accepted, then you can submit your content (see Application FAQs section).
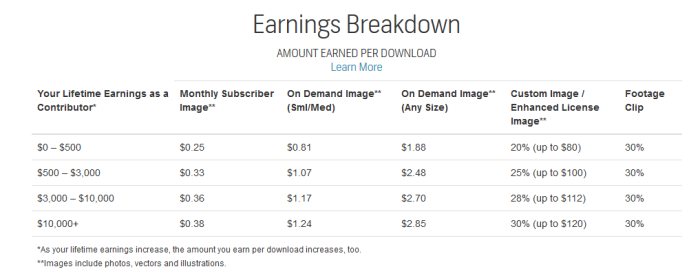
They have four earnings tiers, which depends on your Lifetime Earnings–the amount of money you have earned as a contributor with Shutterstock to date. That means that the amount you earn increases as more of your content is downloaded over time.
You can also make money through referrals. If the referral is approved, you earn $0.04 every time one of their images are downloaded, for the first two years after they were approved. If your referral gets a video approved, you get 10% of the sale price that was paid by the buyer, each time the clip is downloaded. If you refer a customer, you earn 20% of their first payment, up to $200.
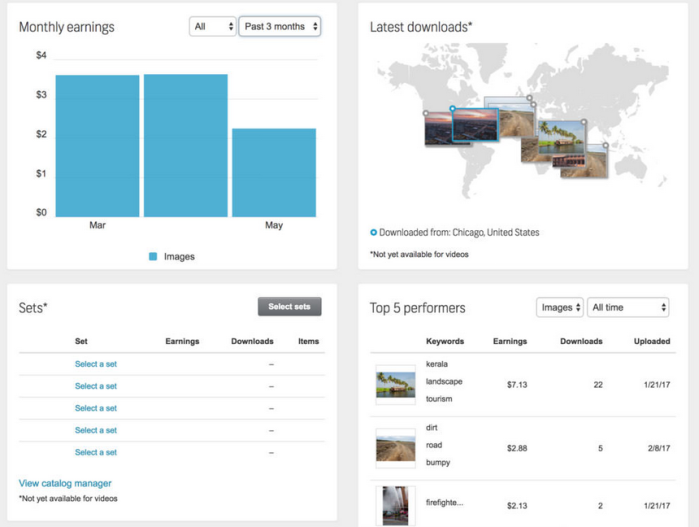
Although their payment is generally low, searching around, it seems like Shutterstock is the favorite among photographers because they tend to earn the most there (e.g., Jarmo Pironen; Daniele Carrer; Steven Heap). It also seems like they have a nice user interface for contributors, which helps you to track your performance which in turn helps you to tag and market your photos accordingly.
Example screenshot of Shutterstock’s dashboard, thanks to PetaPixel
Before you dive in though, you should note that you need to have a 70% success rate the first time you upload images–that means that if you submit 10 photos, 7 of them must be accepted or else you’re turned down. Images must be at least 4.8 megapixels (2000 x 2400) and in JPEG or TIFF format. If you’re not approved, then you have to wait 30 days before you can try again.
offers 50% of all direct sales for exclusive content. Non-exclusive content is 40% of direct sales. There’s also an option to opt into their global network for 30% of the sale. They also note that your total cleared balance–meaning they’ve been paid by the customer (45 days to 3 months)–must be over $50 before they begin paying you at the start of each month.
Alamy doesn’t (directly) accept content taken with a mobile phone. They instruct you to download an app called Stockimo instead and they only mention iPhone, so I am not sure if that means Stockimo only accepts iPhone photos… The minimum payment threshold on the app is $10. The Stockimo app pays 20%, if you signed up after 2014.
They definitely emphasize that they want images from DSLR. Digging around on their website, they want one with a sensor that is 17.3 x 13mm, which means that you don’t have to have a full frame camera. They also provide examples of what is acceptable and what is not, which I think is helpful.
I can’t find very many people who have written about their experience with Alamy. They’ve really managed to dominate the first couple of pages of my Google search results with their internal forum, which is mostly positive of course. I found one external review, by Marolook, that made me feel kind of nervous about submitting content to them, but this post by John and Maria seems positive. Share your experience in a comment if you have worked with Alamy please!
Fotolia has closed. All images must be submitted to Adobe Stock. With Adobe Stock, you earn a 33% commission for photos and vector art and 35% for videoes. You have to have a Paypal or Skrill account for payment and your account must reach at least $25 in royalties before you’re paid. You get directed to the same site when you click the Also, it seems like you don’t have to subscribe to any of their products or have a Creative Cloud membership to submit, but it’s probably convenient to do all of your editing in one place and just submit from there. Someone please correct me if I’m wrong. Also, according to this review, Adobe allows you to edit your keywords, title, and information even after you submit. They also seem to indicate that Adobe has good customer service and a quick turn-around time for getting back to you about your submission, although they may be more rigid when it comes to judging the quality of your content.
It seems like you need to make sure all your paperwork is up to date though. If you haven’t submitted your tax documents, apparently they’ll withhold $0.07. That’s small in an absolute sense but imagine if your boss withheld 28% of your paycheck!
They offer 60% for exclusive content plus upload bonuses, while non-exclusive content is worth 25%-50% of net sales. You can’t get any more information than that unless you sign up. I distrust sites like that so I didn’t do this. If you know more, please share in a comment. According to this site, you can’t withdraw until your account balance exceeds $100, which seems pretty steep to me.
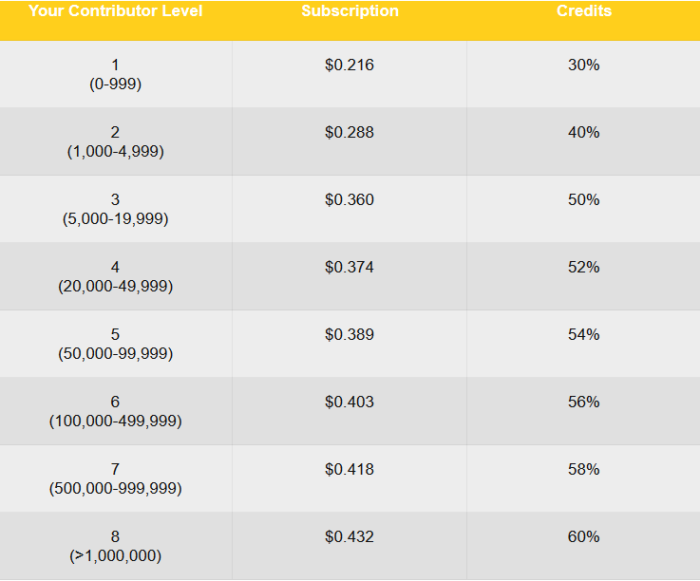
You can earn between 30%-60% from each license that is sold (see table below for more details). Your payment depends on contributor level, according to this site. You want more than 1000 photos accepted to earn more. You have to reach a minimum balance of $50 before you are paid. If you don’ have a PayPal or Skrill account for payment. Payments are distributed automatically between the 13th and 17th of the month.
Their content is non-exclusive so you can upload your photos to other sites that are also non-exclusive. When you apply to be a contributor, you have to submit 10 sample images with keywords for review. You should know if you’re accepted in about a week. Photos should contain a minimum of 6 million pixels and JPEG format with no more than a 80% quality compression. From what I can gather, it seems like they accept pictures that have been taken with your mobile phone.
They’re an exclusive site that takes a co-op approach to compensation, offering a 50-75% commission. They accept high resolution digital files in addition to film scans, Polaroid scans, and mobile images. The website states that photos must be in JPEG format and a minimum of 6 megapixels (approx. 3000 x 2000). The website doesn’t explicitly say how often they pay and if there’s a minimum amount you have to reach before you can collect your earnings.
Their standards seem pretty high but they will work with you by providing constructive feedback, so you have to have thick skin if you are considering contributing (see example here; another example). Generally, photographers’ reviews seem positive (another review)
They only accept high resolution images (JPEG files with a minimum of 3MP file size)–this link by the way is really helpful in explaining what they are looking for and provides examples. They also provide feedback on why your content was rejected and encourage you to resubmit.
They accept exclusive and non-exclusive content. Exclusive licensing is worth 60% of net sales while non-exclusive content is 30% net of any non-exclusive license purchased. Sales take about 45 days to process and you can receive payments through your bank account in addition to PayPal. They have other options too but it may result in a fee.
There’s been some recent changes in their Creative Commons licensing though so I’m a bit confused as to how much of the above information applies. They closed the 500px Marketplace after merging with Getty Images but they’re still paying their royalty rates. You can read more about here.
Concluding remarks
There’s one important requirement that applies to all of the sites that I haven’t covered yet: Release forms. The most important requirement to know ahead of time is that you have to submit a model release form if your photos have (recognizable) people in them. You also need a property release form if the photo was taken on private property. I’m not an expert in this so I recommend researching this on your own. I think this site is a pretty good place to start learning about all of these various release forms. I think the safest bet is to always get your model to sign a release form. There are apps like Model Releaser that make it pretty convenient to collect these signatures, although I haven’t used it yet, so I don’t know how comprehensive it is. They mention that there are in-app charges, so they probably limit things like how many forms you can save and/or what type of release form is available for free.
All in all, you probably won’t make a ton of money from these sites, unless you’re a fantastic photographer who knows how to market yourself extraordinarily well. With that said, if you have a cell phone and have taken some photos, why not go back through them and see if you can sell them for (maybe) some extra cash? Personally, I’ll probably start with Shutterstock since they document their requirements really well. I’ll share details about my attempt(s) in a future post.
With moving, traveling, dealing with a wrecked car, and finishing my dissertation, I’ve fallen behind on blogging. I miss it and I will start again soon! In the meantime, instead of sharing my usual impersonal blog posts where I share a tutorial or give tips on teaching or policy communication, I will share some photos from my trip. Hope you enjoy!
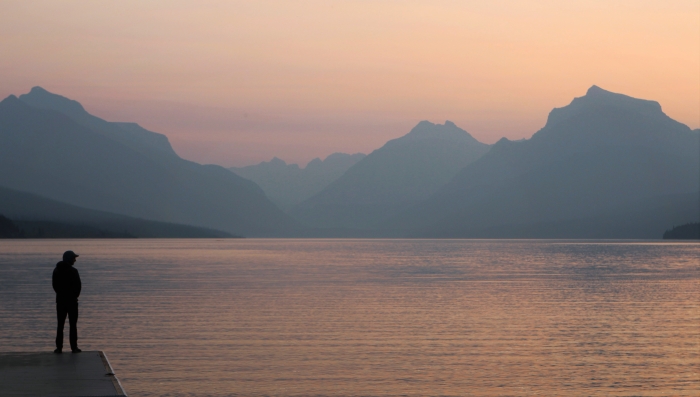
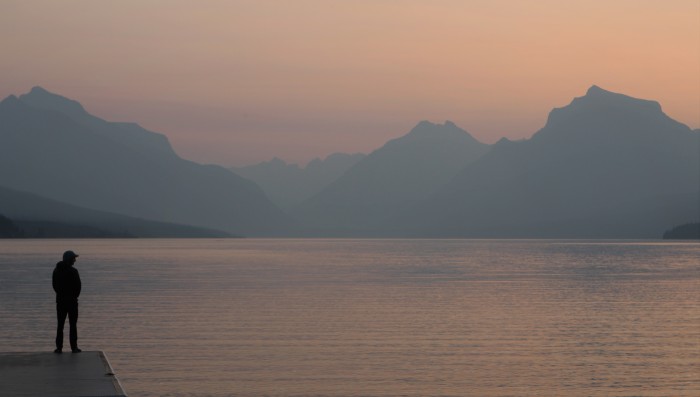
Sunrise at Glacier National Park
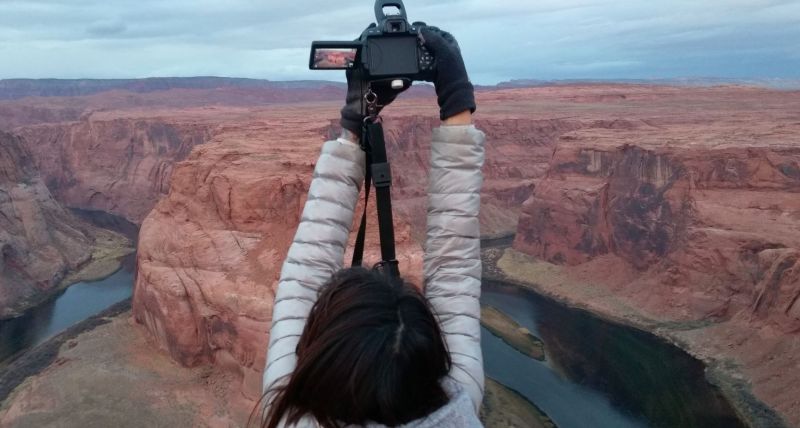
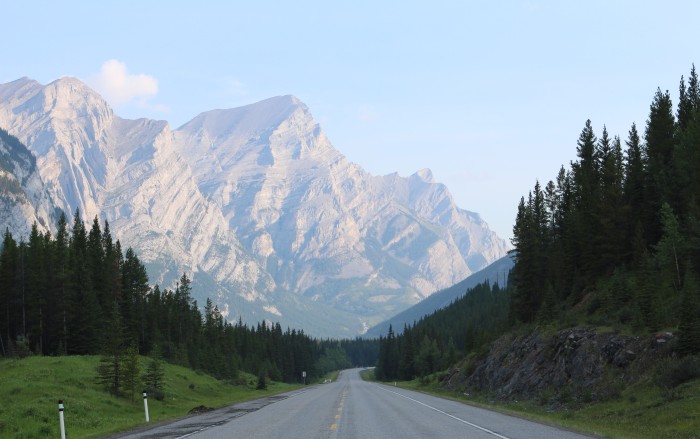
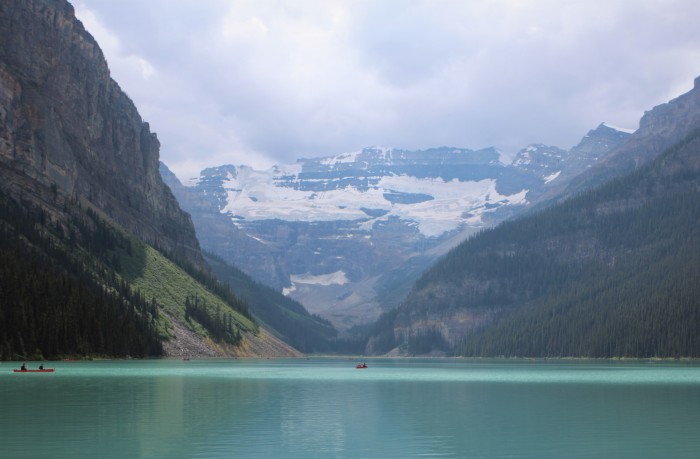
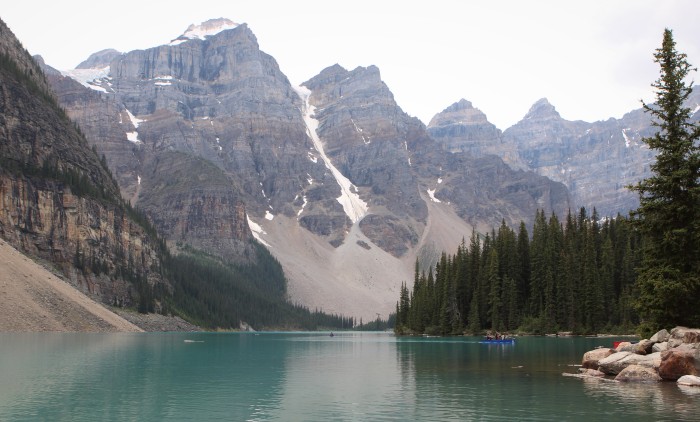
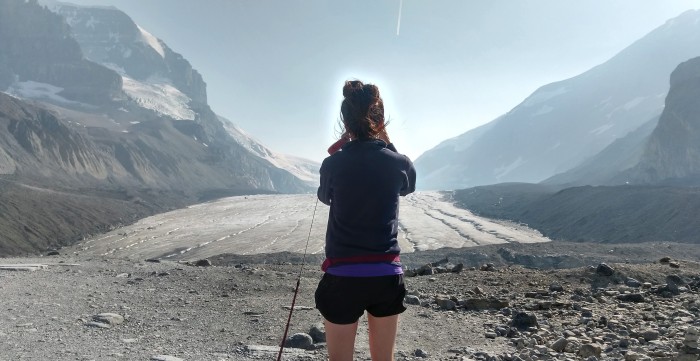
From Peter Lougheed Provincial Park in CanadaLake Louise, Banff National ParkMoraine Lake, Banff National ParkInteresting halo effect of me taking a picture of the ice fields in Jasper National Park
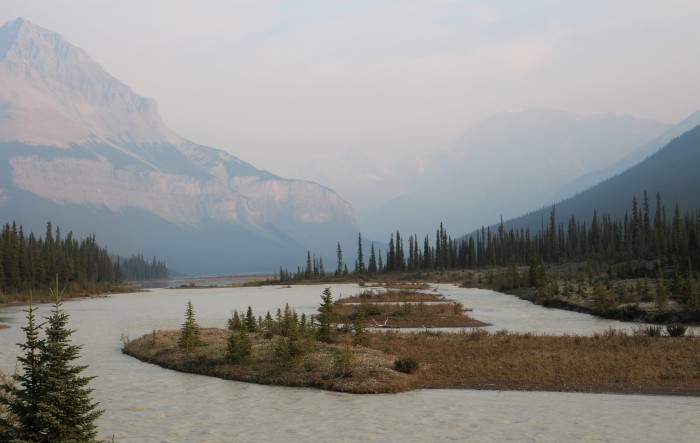
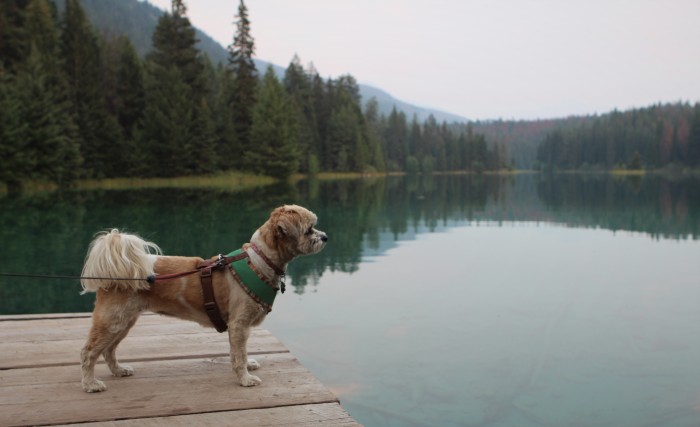
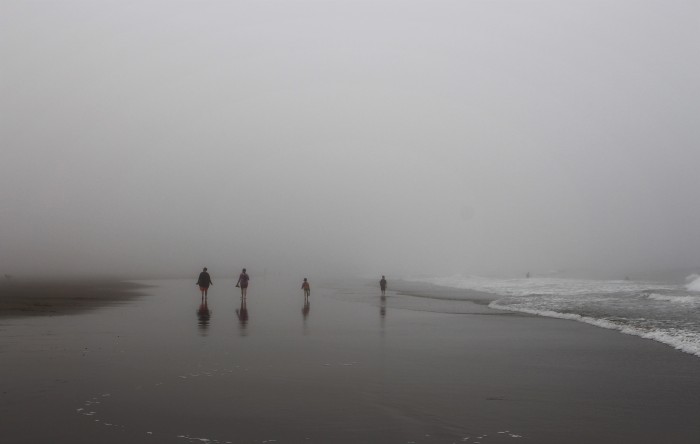
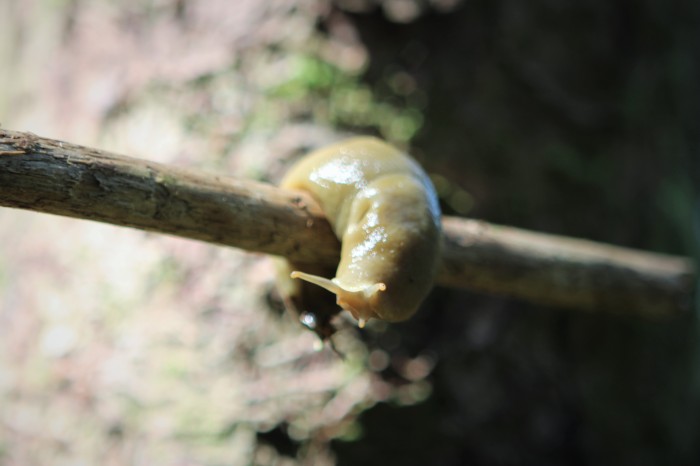
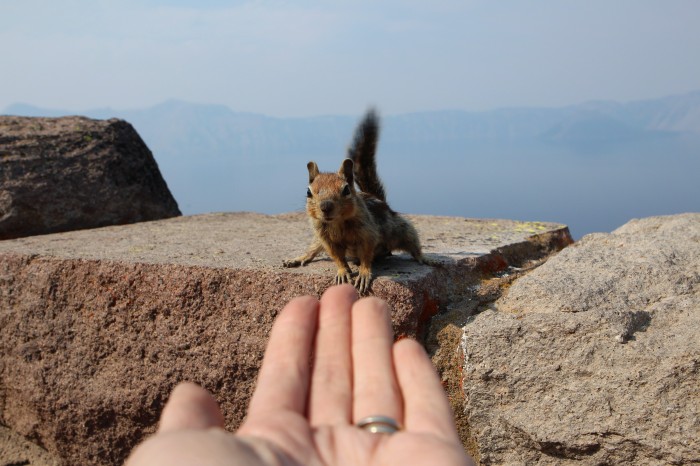
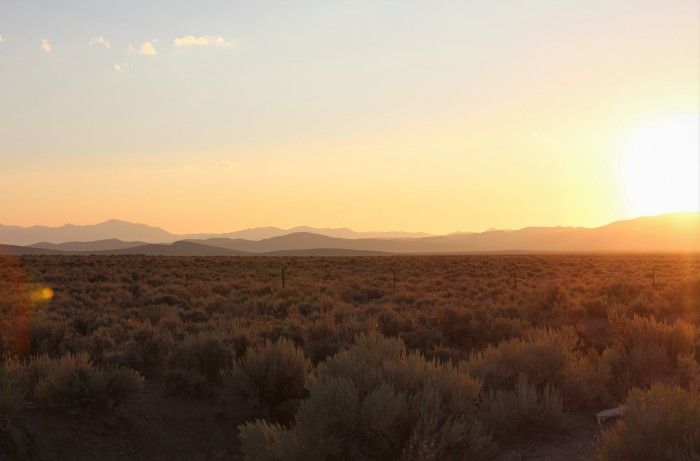
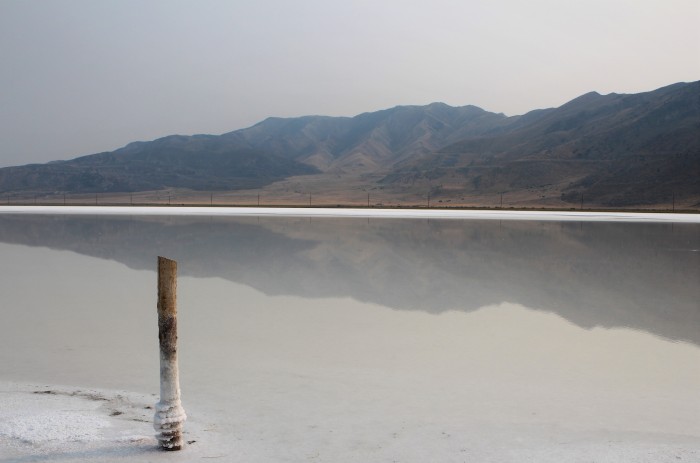
Near our unplanned campsite in Jasper–the road was closed because of a large car accident. Sixteen people lost their lives in Jasper that weekend…Mochi enjoying the serene lake in Jasper National ParkFoggy day on the coast of WashingtonEncounter with a banana slugMy closest encounter with a chipmunk at Crater LakeWhere the car broke down–i.e., middle of nowhere NevadaThe salt flats in Utah. The last picture before returning to Colorado.