The Kaiser Family Foundation conducted a poll in the beginning of March showing that a third of their respondents said that the coronavirus (COVID-19) outbreak had a minor or major negative impact on their mental health. That proportion jumped up to nearly half (45%) when they conducted the poll again between March 25th to the 30th. In response, the HHS has relaxed telemedicine and telemental health restrictions so more individuals and families can get access to care safely. This is an important and necessary measure to increase access to care but with the recent Zoom privacy debacle (e.g., NPR; CNBC), I couldn’t help but wonder what this means for the privacy of patients and therapists, or any one of us who has used or currently uses video conferencing software to speak with a doctor, socialize, or work. After researching different options, I found that you don’t have to compromise your privacy or security and I shared a list of secure and unsecure options below.
Quick background on HIPAA for
First, here’s quick primer on HIPAA, which got me thinking about this topic in the first place.
HIPAA (Health Insurance Portability and Accountability Act of 1996) is United States legislation that provides data privacy and security provisions for safeguarding medical information. The legislation essentially requires that all healthcare practitioners and administrators must protect our Protected Health Information (PHI) through a secure system that ensures that only authorized individuals can access our data. This is true whether the information is on paper or in a computer system, including any information transmitted over the internet like video conferences. You can read more about HIPAA through the HHS website.
Quick non-technical explanation of video conferencing software in relation to HIPAA
Prior to the coronavirus pandemic, HIPAA restrictions meant that telehealth practitioners had to use video communication systems that incorporate end-to-end encryption (E2EE) for video and audio to be HIPAA compliant. I’m going to oversimplify this here but that essentially means that when our computers are transmitting the audio and video from our meetings to someone else’s computer, the data needs to be scrambled so that only meeting participants can access and unscramble the audio and video content in a meaningful way (using keys). The details are a bit more complicated though because there are different ways to encrypt this data, which can be confusing if you don’t look into the details. For example, in the case of Zoom, the company does use encryption, but they use a type of encryption (transport encryption rather than E2EE) that enables Zoom to access the audio and video content of the meetings that it hosts. With E2EE, Zoom would not be able to access this content.
There are apps and software out there that offer or use E2EE (and have been consistently transparent about whether they use E2EE or not). Here is a list of some that I found:
Video conferencing software that DOES use E2:
* indicates that it is free or there is a free version available.
It’s also worth noting that Facebook, the parent company of WhatsApp, was not transparent about data collection in the recent past. So maybe consider a different app if you’re concerned about protecting your and others’ privacy…
The following video communication apps also do not use E2EE and are public facing so they should never be used for telehealth:
Facebook Live
Twitch
TikTok
In closing
None of these companies can guarantee that your PHI or any information that you disclose over video conferencing will be 100% safe. There will always be the risk from hackers, for example, that can jeopardize your security and privacy. If you’re using video conferencing professionally, it’s important to disclose this risk. If you’re a health care practitioner, I especially hope that you will consider using software that protects the privacy of your patients. There are free options available, so there really is no excuse for using a less secure option.
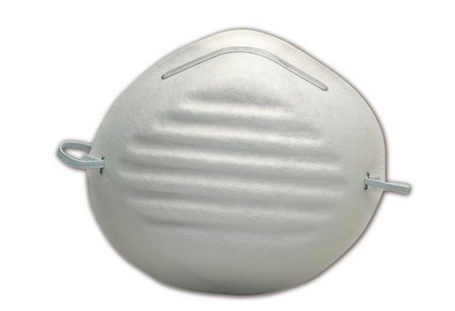
The CDC has been reconsidering their recommendation on the use of non-medical masks among the general public (see NPR article). To preserve surgical masks for professionals, I’ve shared some links to patterns and instructions for making your own mask below. I also added some information about what type of materials are recommended.
*If you choose to make a mask, make sure that you keep it clean. There isn’t an official recommendation but keep in mind that bacteria grows in moist environments and the science is still out on whether COVID-19 can survive on fabric (or how long). Also, wash your hands after taking it off.
Materials
To make a mask, you’ll need the following:
Tightly woven fabric –see below for more information
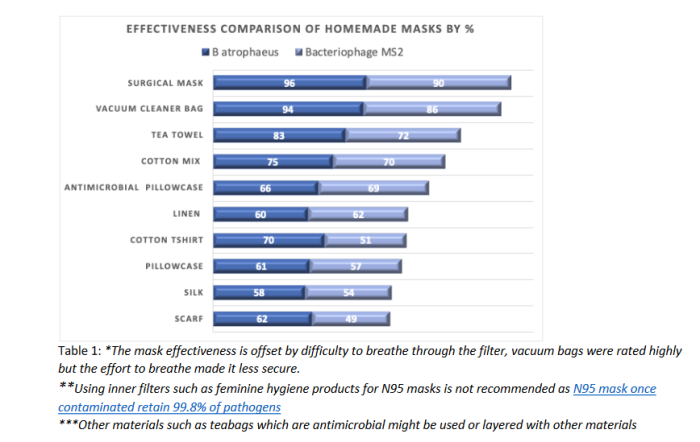
Effectiveness of Non-surgical Mask Materials from the Stanford Anesthesia Informatics and Media Lab
Basically, you want to use a breathable material that can filter out germs. For thinner materials, like cotton t-shirts, scarfs, and pillowcases, consider doubling the number of layers. For the two materials on the top of the list (vacuum cleaner bags and tea towels), I included a brief description below.
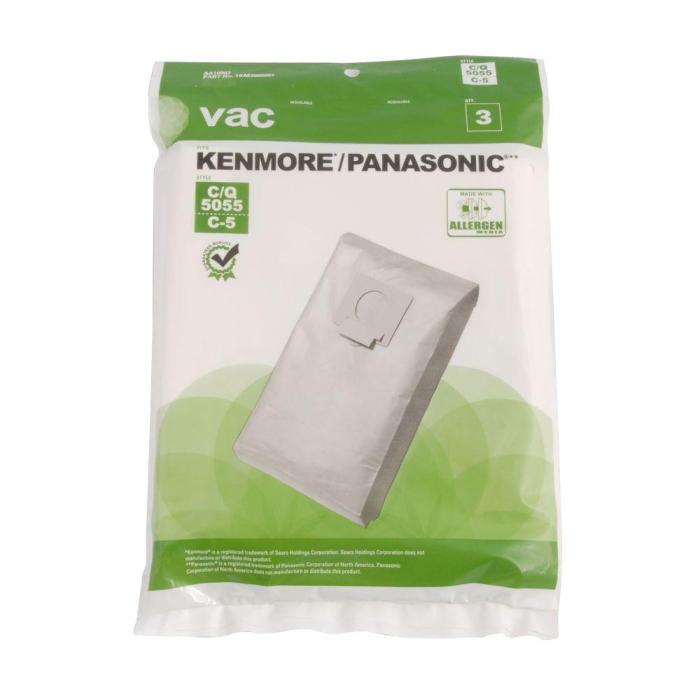
3-pack Kenmore/Panasonic vacuum bags from Home Depot
Vacuum Cleaner Bags: These bags are often made of a tight blend of cotton or synthetic cloth or paper but be careful if you decide to go this route because many are difficult to breathe through. You can buy vacuum cleaner bags from stores like Walmart, Target, Amazon, etc. The image above is a set of replacement vacuum bags from Home Depot that are $6.49 for 3.
TeaTowel: These towels are typically made of linen, cotton, or a combination of the two. Note that tea towels are not the same as dish towels. Dish towels are made of terry cloth, which are much heavier (like the towels in you likely have in your bathroom). Tea towels are more tightly woven than dish towels and should be much thinner. Tea towels can be expensive though, especially if they’re made from high quality linen. Another cheaper option is a car shop towel, which you can get in the auto section of stores like Lowe’s, Home Depot, Walmart, or Target, or from an auto store like AutoZone. See link below for a mask tutorial using car shop towels.
Mask Patterns & Tutorials
Regardless of the pattern you use, you want to make sure that the nonsurgical mask (1) covers your nostrils and (2) goes below your chin. You also want the edges of the mask to touch your face. With that said, here are some good tutorials on how to make your own mask.
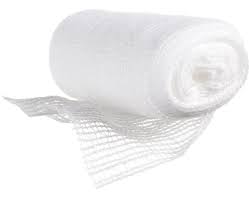
Pro-tip from my mom: she added a layer of gauze and a dryer sheet to the inside of her mask:
Example of what gauze looks like
You may find gauze in a first aid kit somewhere in your house. If not, you can easily get some from a drug store or the pharmacy aisle of a grocery store.
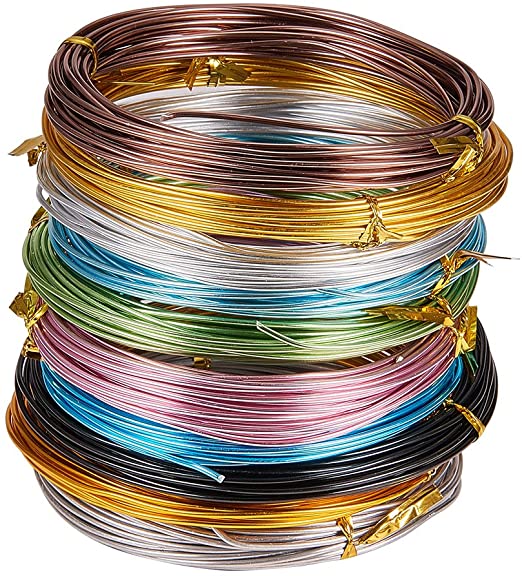
You also may have noticed that medical masks have aluminum clips on them to press the mask down over the bridge over your nose:
Example of metal clip found on medical masks
This is harder to find and I haven’t found a good solution to this. You might be able to use a an old bread twist tie. You may also be able to use thin aluminum wire from a craft store or home depot:
There are still mixed messages about the effectiveness of DIY nonsurgical face masks in protecting you from getting sick. Here’s my take: If it makes you feel better, go for it! It doesn’t hurt–unless you’ve chosen material that you can’t breath through. Also, it’s a decent way to prevent yourself from touching your face and by making your own, you’re preserving the protective equipment for those who need it most like doctors, policemen, and grocery store workers.
It’s important to remember though that face masks are not a substitute for social distancing or washing your hands. Keep doing both to keep yourself and others safe.
I am so overwhelmed by the amazing sacrifices that people are making around the world to help others during this crisis. If you would like to help as well but are unable to physically or financially, I’ve compiled a list of remote opportunities. Please share any that I missed in a comment below and I’ll add it to this list.
CV19 is a volunteer organization based in the UK that provides Cyber support.
New York State COVID-19 Technology SWAT Team needs teams of professionals (preferably from a single institution located in the Eastern or Central U.S.) with experience in product management, software development / engineering, hardware deployment and end-user support, data science, operations management, design, or other similar areas. Volunteers must commit for a minimum of 90 days.
Join the COVID-19 Open Research Dataset Challenge, or CORD-19 to develop text and data mining tools using AI and machine learning techniques. The goal is to help provide answers for 10 tasks, or lines of inquiry about the disease. The prize for each of the tasks in the CORD-19 challenge is $1,000, delivered as cash or as a charitable donation to research and relief efforts.
Donate computing resources to the Folding@Home project. The software models protein folding in a search for pharmaceutical treatments that will weaken the ability of COVID-19 to attack the human immune system. You can read more about the project in this post and how to set it up here.
Research
Help find service manuals for critical medical equipment. There are several types of medical equipment made by different manufacturers. Researchers and engineers need access to the manuals so that the equipment can be quickly repaired if and when they break. Read more about the project and how to volunteer here.
Marketing & Social Media
Marketing, social media and branding experts are needed to help promote PandemicVolunteers.org. More details here.
Work with Project N95 to support and coordinate with federal and state government institutions to secure and distribute personal protective equipment for medical workers around the country. You can also provide your information and background to the Digital Response Team, which will match you with an opportunity based on your skills.
Caring and Active Listening
I mentioned 7cups, a free therapy organization, in a previous post. You can volunteer for them as an active listener and help someone who is in need of support.
Prefer to text rather than chat over the phone? You can train to become a crisis counselor with Crisis Text Line. They ask that you volunteer 4 hours a week for at least 200 hours. You can also help by sharing resources for managing stress and anxiety related to the pandemic such as VirusAnxiety.
There’s also Kind Connection, which involves kindly and thoughtfully listening to individuals who need support with COVID-19 related struggles (this is a program based in the state of Colorado).
It’s important to note that these DIY projects are only secondary to FDA approved products, such as the N95 mask. Make sure to keep up with the latest information about the safety and acceptability of homemade gear.
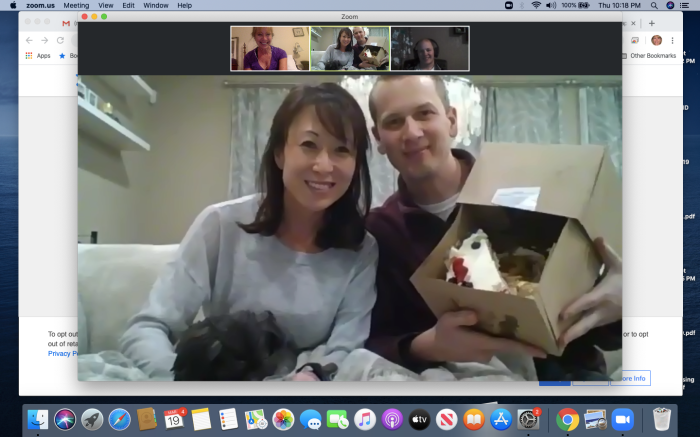
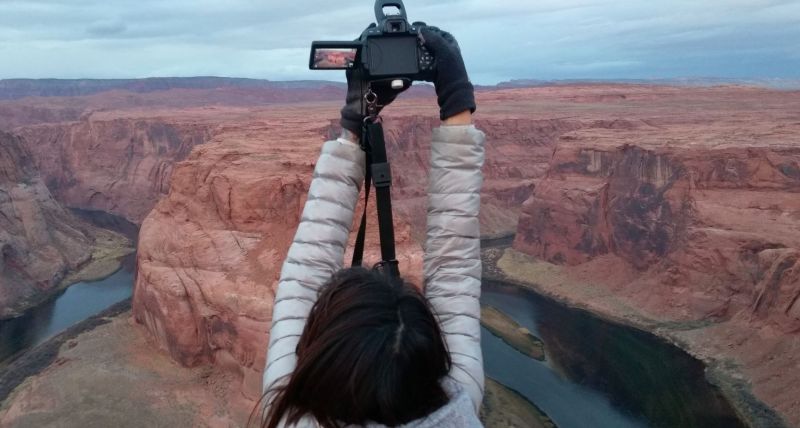
Since the grim news about the infection rate, mortality rate, and social and economic toll (e.g., Washington Post; Vox; CNN; fivethirtyeight; NPR) is being thoroughly covered by the media, I thought I would follow the lead of my mother-in-law and fellow blogger, Yvette Francino, in sharing ideas for safely socializing, up-skilling, volunteering, donating and staying healthy and entertained during the outbreak. Before you go through my list, I highly recommend that you look through her list of great ideas, which you can read on her blog (full disclaimer: I am featured on her blog because I celebrated my birthday virtually through the meeting app, Zoom):
Celebrating my birthday virtually over the meeting app Zoom with my family because of the coronavirus (also referred to as SARS-CoV-2 or Covid-19). Credit: Yvette Francino
Socialize
Virtual Meetings for 3+ people
Zoom works on most devices (e.g., Mac, Windows, Linux) and offers a free basic plan. One thing to note is that if you sign up for the free tier, your meetings are limited to 40 minutes if there are 3+ participants meetings a with the max number of participants capped at 100. There are no time caps for 1:1 meetings. If you are a K-12 educator, Zoom is currently offering you access to their platform for free (see this Forbes article for details).
Skype also works on most devices and offers a free plan. It’s unclear whether Skype allows multiple participants.
Steam is a popular game distributor that works on Windows, Mac, Linux, and mobile devices. They have some games that are available for free but most games are not free. Some of my favorites are the Jackbox Party series, which you can play with friends by hosting a game on one of the virtual meeting apps I listed above. Note that to play the Jackbox games virtually with your friends, they’ll need two devices: one for the meeting app to view the shared screen and another to play the games (they recommend a mobile device).
Origin is another popular gaming platform that works on most devices and offers free games but most games are not free.
Not a gamer but enjoy watching others play games? Then there’s always Twitch. You can also watch and support artists and musicians on Twitch as well (e.g. musicians channel).
Virtual Concerts & Tours
Several artists and musicians are streaming live performances (see this list curated by NPR)
Join a virtual book club like this one that’s organized by Walt Hickey, the author of the Numlock News series which I also highly recommend subscribing to.
Practice yoga for free with great YouTube instructors like Sara Beth who has 10-60 minute videos on different types of practices with modifications to accommodate all skill levels and abilities. You can also pay for platforms like CorePower Yoga.
Breathe2Relax is a free stress management app for iOS and Android that was developed by the U.S. Department of Veterans Affairs for anyone coping with trauma and anxiety. The VA has also developed other free apps that you may enjoy as well, like the Mindfulness app.
7 Cups for iOS and Android is a free app that connects you to caring listeners for emotional support. They also provide online therapy for as little as $150 a month.
Talkspace for iOS and Android is an app that connects you with licensed therapists. They have multiple pricing tiers that range from $260 a month to $396 a month. They also offer couples therapy. More information on pricing here.
BetterHelp is an online text-based or chat-based counseling platform that connects you to therapists that specialize in individuals, couples, and adolescents. They charge between $40 to $70 per week.
Gottman Apps for iOS and Android is a free app developed by clinical psychologists, John and Julie Schwartz Gottman, and designed for couples.
Calm is a free mediation app for iOS and Android devices. Headspace for iOS and Android is a guided meditation app. It’s available by subscription only and costs $12.99 a month or you can pay $95.88 for the full year.
If you’re in serious crisis, you can always call the Suicide Prevention Lifeline, toll-free, at 1-800-273-8255.
Learn
You can enjoy several free online courses that were developed by prestigious institutions like MIT, Harvard, and Berkeley through education platforms like edx and Coursera. Here’s a list of free culture courses from Harvard. There are also education platforms that are not free but offer nano degrees, like Udacity, or are fee-per-course and cover a range of topics such as Udemy, or are subscription based like Skillshare and Brilliant.
Speaking of kids, SciShow created a subchannel that is entirely dedicated to kids. RadioLab also curated a list of podcasts that are kid-friendly.
Helping others if you can
If you’re healthy and able, also consider helping others by:
Picking up a few shifts at a local grocery store or distribution center and delivering food to support local businesses and their employees who are trying to keep their doors open, shelves stocked, and make sure people are fed.
Donating blood to organizations like the Red Cross. According to their website, we’re currently facing “a severe blood shortage due to an unprecedented number of blood drive cancellations during this coronavirus outbreak.” Make an appointment here or call 1-800-RED-CROSS to find a local donation site.
Donating funds to No Kid Hungry, which is an organization that ensures that millions of young children get access to food while schools are closed. You can also donate money, food, or hygiene items to Feed the Children, which partners with food pantries, soup kitchens, churches, and shelters around the country. There’s also Feeding America, which is a nationwide network of 200 food banks and 60,000 food pantries that serve vulnerable communities of children and adults across the country (find your local food bank here).
Donating to nonprofit organizations like Direct Relief or Center for Disaster Philanthropy Covid-19 Response Fund, which help to equip the amazing healthcare workers and service providers across the country that are putting themselves at risk everyday with lifesaving resources like masks, gloves, and gowns.
Donating or volunteering with Meals on Wheels, which is an organization that checks on vulnerable seniors, in addition to providing them with food, healthcare supplies, and transportation.
There are many other wonderful charities out there that are doing amazing work. If you want to check if a charity that you’re interested in is one of them, I recommend researching them on GiveWell.
Please rememberthat even if you are unable to do any of the above, you are doing plenty enough by following the general suggested guidance of maintaining your distance from others (especially if you are sick), avoiding the urge to hoard, and staying informed. By maintaining your distance and avoiding public spaces, you’re saving lives by reducing the risk of transmission.
Thank you for doing your part! Please share your ideas in a comment below or through another medium like twitter or a blog to inspire others.
I started to dive back into web programming and learned that you can host a small project on Github Pages for free, if you have an account (if you don’t have a Github account, you can get sign up here which is also free). Github’s instructions only outline the process for for setting up your site when you use a template or copy someone else’s repository. In this blog post, I walk through the process how to do this when you don’t want to use an existing repository or template, and want to add a custom domain name. FYI, I have a Windows 10 PC and the tips I share may not apply for Apple devices. I also assume that you’ve created a site that is ready for hosting.
Install & Configure Git
Assuming that you have a Github account and are signed in, you need to download and install Git on your PC. If you haven’t used Git before from the command line or PowerShell, it’s worth taking some time and skimming the book on their site to learn some of the basics, which I will not cover here. Once you’ve installed Git, follow the instructions here to set up your username–you’ll need to decide if you want to use the same name for every repository on your computer or set up a new one each time–then set up your email address using the instructions here. Lastly, you’ll need to authenticate with Github using the instructions here. Github recommends using HTTPS. I would stick with this method because it’s the least complicated.
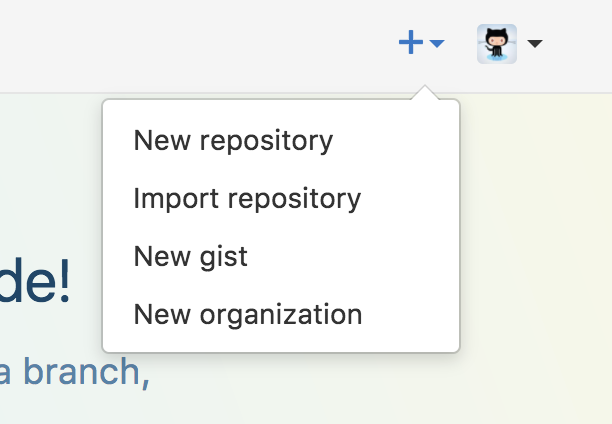
Github Repository
Sign into Github and select the “+” by your profile icon in the top right-hand side of the screen to create a new repository:
When prompted to name the repository, it should be your username, followed by “github.io”
username.github.io
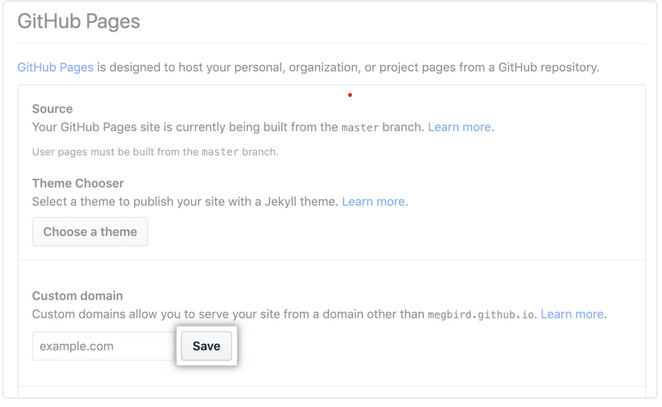
Setting up Github Pages
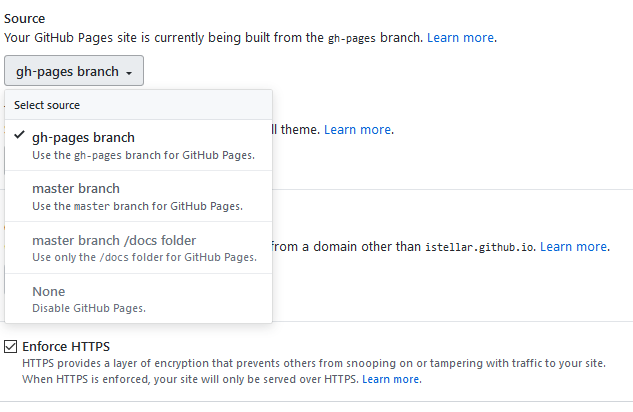
Once you’ve created the repository, go into your settings:
Scroll down to Github Pages, where you’ll see the option to change the Source. Select “gh-pages branch.” Also, check the box that says “Enforce HTTPS.” –If you continue to scroll down, you’ll see other various options such as the option for deleting your repository, transferring it, etc. You may be tempted to select the option to make the repository private but know that you cannot do this if you have a standard Github account.
Now, scroll back up to the top of your settings and add the name of your website. For example, I named mine “Portfolio.”
Adding your website files
There are two ways to do this:
(1) You can manually upload the files/folders for your website to your repository, one by one.
or
(2) You can push your files to your repository using Bash, PowerShell, or CMD. I’ll walk through the steps for using the command line, since you may not want to download and install any additional software.
Within the command line, change the current working directory to the folder that your project is saved in (which is your local repository). For example:
cd C:\User\stella\Desktop\website
Next type:
git add .
This will the files in the folder and stages it for commit. If you made a mistake and want to unstage the files, type:
git reset HEAD YOUR-FILE
If everything is correct, then you can commit by typing:
git commit -m "first commit"
The -m “first commit” is an optional message that you included with the commit. You can, and should, add a message with each commit so that you can more easily track the changes that you made. To remove the commit or modify the file, you can type:
git reset --soft HEAD~1
Lastly, push the files to your Github repository by typing the following:
git push origin gh-pages
“gh-pages” is the branch that we just created for hosting your site. You can also push to the “master” branch and then push those files to your “gh-pages” branch, if you prefer.
Now, if you don’t have a custom domain, you’re done! Depending on how large your files were, your website should be live within 5-20 minutes. You can see it by going to
your-user-name.github.io/your-website-name
Adding a Custom Domain Name
If you purchased a domain name, you can add your domain name in the Settings under the Github Pages section:
Then log into your domain name provider and create a CNAME record that points to your subdomain on Github. (CNAME record where host is www and the site is your-username.github.io.)
Github is sensitive to capitalization, so if you have photos that end .JPG rather than .jpg, they will not show up on your site.
Also, the space that you get with a free account is of course limited, so try to keep large files like videos and photos to a minimum.
Lastly, be super super careful not to upload any sensitive or private information, since they will be accessible to anyone who visits your Github profile.
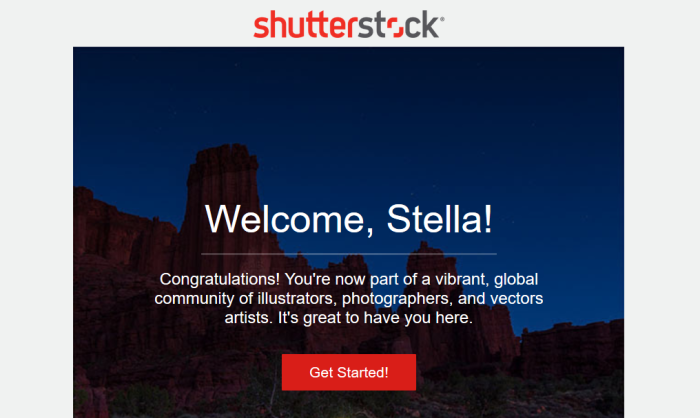
Backstory: A few days ago, I did a deep exploration of stock photography companies by exploring their compensation structure, content requirements, and others’ reviews (see here). Afterwards, I felt like I had a pretty decent grasp of the process, so I thought I would start digging through some photos that I could possibly submit and give it a shot.
Submission Process
Deciding on images: I narrowed down my potential list of photos to about twenty images and then carefully looked over the quality (full description from Shutterstock here):
Images were at least 1200 x 3000 pixels
In JPEG format
Editing: Next, I needed make some basic minor corrections, like white balance and adjusting highlights and shadows. Because I’m not an expert in photography and because this is just a side gig, I decided that it doesn’t make financial sense for me to pay for Adobe Lightroom, although I would love an excuse to purchase the software–Readers: Adobe is not paying me for advertising. Adobe: if you want to pay me to advertise, I’m willing to discuss the terms ^_^. Instead, I went with Rawtherapee, which is free. There are others out there, but I felt that this was the closest to Lightroom and there were some pretty thorough tutorials on how to use the software to inspect and edit my photos (YouTube tutorials: 1, 2). After editing my photos and inspecting them, I narrowed my selection down to 10 potential submissions.
Selecting Photos to submit: My decision process was driven by image quality (e.g., chromatic aberration; lens flare) and whether or not I could imagine an application for the photos. It’s helpful to ask yourself, “Who would use this photo and where and why?” Truthfully, the latter exercise filled me with a lot of doubt because I think it’s probably stronger to have photos with models acting out a concept like “success” or “using technology.” I got over it though because really, this is something I can keep in mind in the future when I’m taking more photos. Right now, it’s more about learning how to edit my photos and figuring out how to navigate the submission portal.
Submission Guidelines: After deciding which photos I was going to submit, I reviewed the guidelines and signed up with Shutterstock as a contributor. If you’re interested in signing up, I hope you consider showing some love and using my referral link–Full Disclosure: I would earn $0.04 for every image that someone downloads from Shutterstock, which is not taken from your earnings, for the first two years after you sign up (more details here).
Signing up and submitting for review: Signing up was simple. You provide an email and password; update your profile information; update your tax information; and then upload your photos. You have to tag your photos with keywords and provide a description of the photos after you’ve uploaded them. Shutterstock will make some keyword suggestions for you based on your image. I also found it helpful to look through a thesaurus for related words and to look through similar pictures and see how they tagged their photos. Next, you can submit. You should get an email confirming that you’ve uploaded photos and they will be reviewed shortly. I read around on the web that this could take a couple of days but mine were reviewed and approved within less than 24 hours! Impressively fast!
One thing you may experience is not knowing what to do next once you’re approved. Your photos won’t immediately appear in your portfolio, so if you’re like me, you may wonder if that means you have to re-upload those photos because that was just a review process and now you’re free to set up your portfolio. DON’T DO THAT. Digging through their forum, I saw that others had similar questions and were advised to wait. It may take another few days for the photos that were approved to show up in your portfolio. Again, this took less than a day for me.
Rejections: I did have one photo that was rejected:
he message said that it was rejected because I didn’t submit a model release form. I’m still a little puzzled by this because I thought that this image fits with their description of “silhouette of a unrecognized person.” It looks like I can resubmit it though with a model release form pretty easily. They even provide templates that you can use.
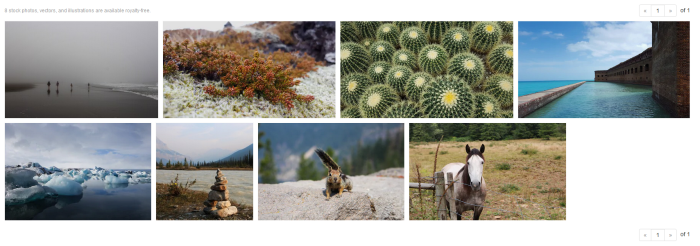
Your Portfolio: After reviewing reasons for rejections, if any, you can upload more photos for review and start sharing your portfolio. Here’s a screen shot of my portfolio so far:
Yay!
Conclusion
All in all, the process was super easy and way faster than I thought! I’m also pretty excited that basically all of my photos were approved–minus the one because of the model release form, but at least it wasn’t rejected on technical aspects! Now, I have to wait and see if anyone actually buys one of my photos. I should probably learn more about search rankings on Shutterstock in the meantime. I’ll share any updates and what I learn in a future post. I’ll also likely try submitting to other sites so that I can compare the process and hopefully my earnings. I’ll share details about that too.
When I was learning about web design, I would commonly come across tips about choosing good stock photos–the (often generic) images that you commonly come across on nearly every website you visit, magazine you read, advertisements you see, etc. I couldn’t help but wonder if this would be a nice side hustle since I have a mid-level DSLR (Canon Rebel T series). BTW, stock image sites also offer different types of media other than photos, like illustrations/vector images, video, and audio. I’m just covering photography in this post. I’ll cover some of the others in the future.
Before I get into how much you can make, it’s probably best to go use cases for stock images. If you are familiar with the content that is sold on stock image sites, then go ahead and skip to the next section.
Primary Types of Usage
Public Domain: Free (non-exclusive) commercial or personal use without a license
Royalty-Free: Copyright license for use without restrictions after paying a one-time fee and/or agreeing to certain use-terms.
Rights-Managed: Copyright license for a specific, one-time use. Additional licenses can be obtained for multiple applications, but still may come with the right for exclusive use.
Creative License: Used for promotional cases.
Editorial License: Used for anything non-commercial like a blog or presentation.
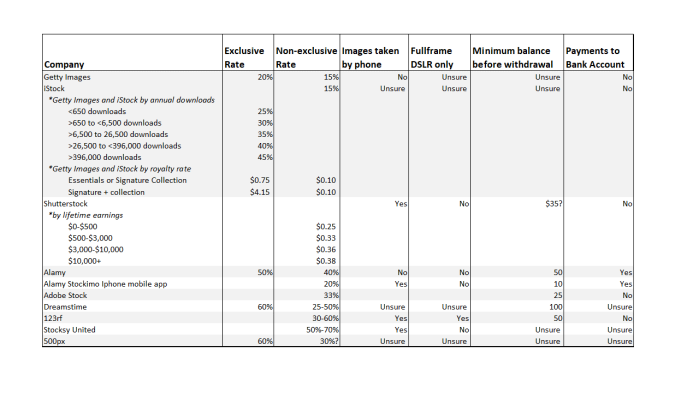
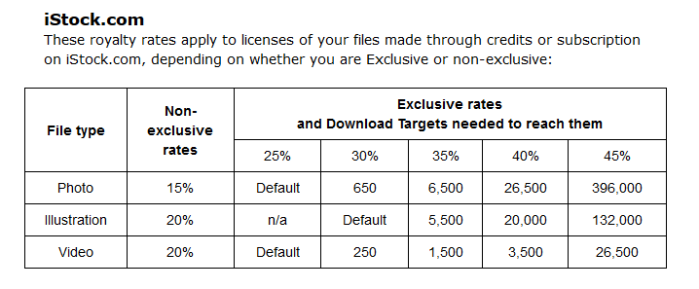
Summary of Requirements and Compensation of Images by Company
I created a table to summarize compensation rates/amounts by company and whether they allow you to submit images that were taken by your phone. A lot of these sites require that you meet a minimum sales balance before you can withdraw your earnings, so I included that information too. Lastly, many of the sites will not directly deposit your earnings into your bank account. I think that’s useful information to know so I added a column for that as well.
Detailed Discussion of Requirements and Compensation by Company
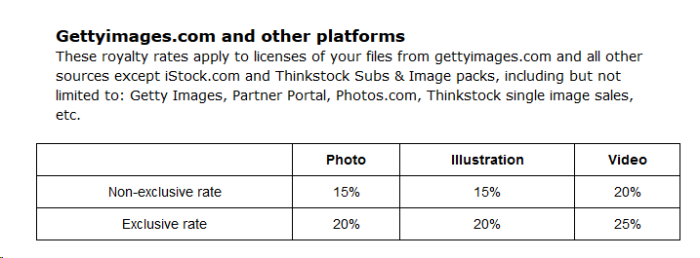
Both are owned by the same company but Getty Images is much more strict about the photos they accept. Accordingly, the payment you can receive from Getty Images is higher than what you can receive from iStock, especially because Getty charges the buyer more for their purchases ($150+).
Although you earn a higher percentage through sales from exclusive contributions (photos that you sell to exclusively to Getty or one of its accepted subsidies and no other stock photo site), the royalty rate you receive is ultimately determined by the number of times your content is downloaded/purchased and whether the purchaser has a subscription. This is calculated on a monthly bases.
Getty images has a reputation for having high quality images though, so their standards, and therefore their rejection rates, are also high. You’ll need a high-end DSLR to consider submitting, which means it’s not even an option for me. It’s definitely a great place to aim for maybe sometime in the future.
iStock on the otherhand, is mostly a microstock service–selling royalty free images–so they charge the buyer less for their purchased content. Their photos sell for around $12 each, which means you’ll earn less than $2 per download for non-exclusive content–and that’s only if the buyer did not have a subscription. If the download is from a subscription customer, you’ll earn between $0.20-$0.50 per download.
Both sites require that your images are in JPEG format and no larger than 3GB. I am not sure if they accept photos taken by a mobile phone or if you have to submit photos produced by a full-frame DSLR. The website does say that your compensation partly depends on file size.
One other thing you should know is that you have to pass a quiz in order to submit your work to iStock and Getty. It seems pretty simple though (see quiz discussed in another blog). Also, you have to apply to submit photos to Getty and iStock. It takes about 30 business days. If you’re accepted, then you can submit your content (see Application FAQs section).
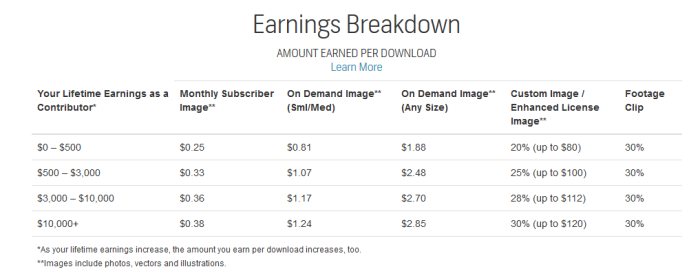
They have four earnings tiers, which depends on your Lifetime Earnings–the amount of money you have earned as a contributor with Shutterstock to date. That means that the amount you earn increases as more of your content is downloaded over time.
You can also make money through referrals. If the referral is approved, you earn $0.04 every time one of their images are downloaded, for the first two years after they were approved. If your referral gets a video approved, you get 10% of the sale price that was paid by the buyer, each time the clip is downloaded. If you refer a customer, you earn 20% of their first payment, up to $200.
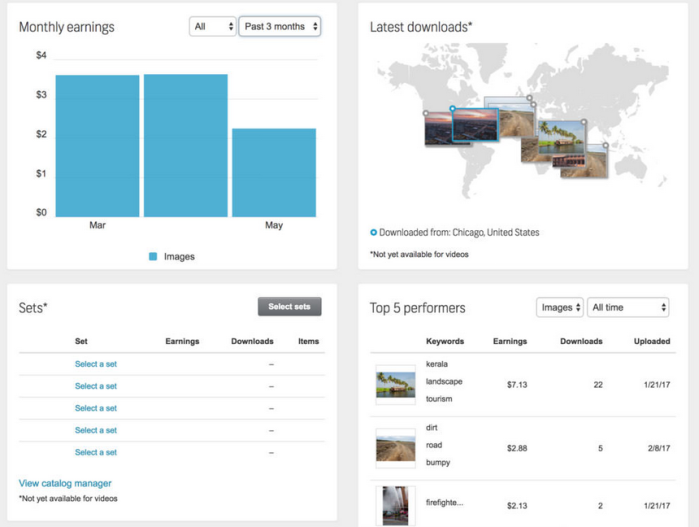
Although their payment is generally low, searching around, it seems like Shutterstock is the favorite among photographers because they tend to earn the most there (e.g., Jarmo Pironen; Daniele Carrer; Steven Heap). It also seems like they have a nice user interface for contributors, which helps you to track your performance which in turn helps you to tag and market your photos accordingly.
Example screenshot of Shutterstock’s dashboard, thanks to PetaPixel
Before you dive in though, you should note that you need to have a 70% success rate the first time you upload images–that means that if you submit 10 photos, 7 of them must be accepted or else you’re turned down. Images must be at least 4.8 megapixels (2000 x 2400) and in JPEG or TIFF format. If you’re not approved, then you have to wait 30 days before you can try again.
offers 50% of all direct sales for exclusive content. Non-exclusive content is 40% of direct sales. There’s also an option to opt into their global network for 30% of the sale. They also note that your total cleared balance–meaning they’ve been paid by the customer (45 days to 3 months)–must be over $50 before they begin paying you at the start of each month.
Alamy doesn’t (directly) accept content taken with a mobile phone. They instruct you to download an app called Stockimo instead and they only mention iPhone, so I am not sure if that means Stockimo only accepts iPhone photos… The minimum payment threshold on the app is $10. The Stockimo app pays 20%, if you signed up after 2014.
They definitely emphasize that they want images from DSLR. Digging around on their website, they want one with a sensor that is 17.3 x 13mm, which means that you don’t have to have a full frame camera. They also provide examples of what is acceptable and what is not, which I think is helpful.
I can’t find very many people who have written about their experience with Alamy. They’ve really managed to dominate the first couple of pages of my Google search results with their internal forum, which is mostly positive of course. I found one external review, by Marolook, that made me feel kind of nervous about submitting content to them, but this post by John and Maria seems positive. Share your experience in a comment if you have worked with Alamy please!
Fotolia has closed. All images must be submitted to Adobe Stock. With Adobe Stock, you earn a 33% commission for photos and vector art and 35% for videoes. You have to have a Paypal or Skrill account for payment and your account must reach at least $25 in royalties before you’re paid. You get directed to the same site when you click the Also, it seems like you don’t have to subscribe to any of their products or have a Creative Cloud membership to submit, but it’s probably convenient to do all of your editing in one place and just submit from there. Someone please correct me if I’m wrong. Also, according to this review, Adobe allows you to edit your keywords, title, and information even after you submit. They also seem to indicate that Adobe has good customer service and a quick turn-around time for getting back to you about your submission, although they may be more rigid when it comes to judging the quality of your content.
It seems like you need to make sure all your paperwork is up to date though. If you haven’t submitted your tax documents, apparently they’ll withhold $0.07. That’s small in an absolute sense but imagine if your boss withheld 28% of your paycheck!
They offer 60% for exclusive content plus upload bonuses, while non-exclusive content is worth 25%-50% of net sales. You can’t get any more information than that unless you sign up. I distrust sites like that so I didn’t do this. If you know more, please share in a comment. According to this site, you can’t withdraw until your account balance exceeds $100, which seems pretty steep to me.
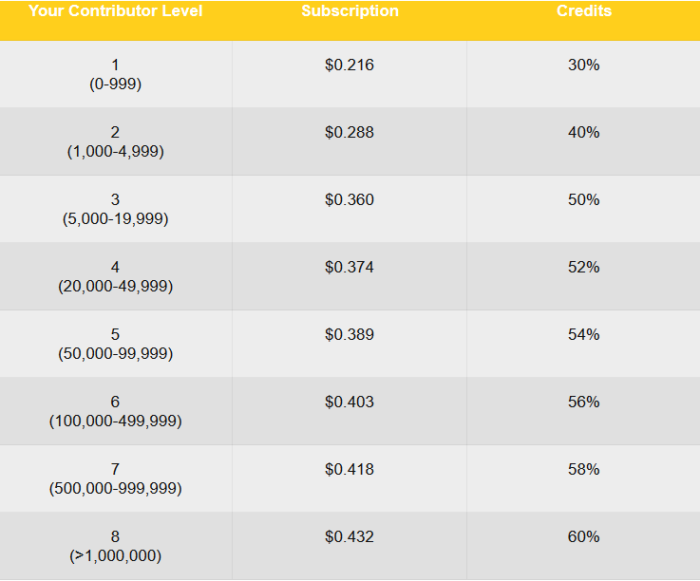
You can earn between 30%-60% from each license that is sold (see table below for more details). Your payment depends on contributor level, according to this site. You want more than 1000 photos accepted to earn more. You have to reach a minimum balance of $50 before you are paid. If you don’ have a PayPal or Skrill account for payment. Payments are distributed automatically between the 13th and 17th of the month.
Their content is non-exclusive so you can upload your photos to other sites that are also non-exclusive. When you apply to be a contributor, you have to submit 10 sample images with keywords for review. You should know if you’re accepted in about a week. Photos should contain a minimum of 6 million pixels and JPEG format with no more than a 80% quality compression. From what I can gather, it seems like they accept pictures that have been taken with your mobile phone.
They’re an exclusive site that takes a co-op approach to compensation, offering a 50-75% commission. They accept high resolution digital files in addition to film scans, Polaroid scans, and mobile images. The website states that photos must be in JPEG format and a minimum of 6 megapixels (approx. 3000 x 2000). The website doesn’t explicitly say how often they pay and if there’s a minimum amount you have to reach before you can collect your earnings.
Their standards seem pretty high but they will work with you by providing constructive feedback, so you have to have thick skin if you are considering contributing (see example here; another example). Generally, photographers’ reviews seem positive (another review)
They only accept high resolution images (JPEG files with a minimum of 3MP file size)–this link by the way is really helpful in explaining what they are looking for and provides examples. They also provide feedback on why your content was rejected and encourage you to resubmit.
They accept exclusive and non-exclusive content. Exclusive licensing is worth 60% of net sales while non-exclusive content is 30% net of any non-exclusive license purchased. Sales take about 45 days to process and you can receive payments through your bank account in addition to PayPal. They have other options too but it may result in a fee.
There’s been some recent changes in their Creative Commons licensing though so I’m a bit confused as to how much of the above information applies. They closed the 500px Marketplace after merging with Getty Images but they’re still paying their royalty rates. You can read more about here.
Concluding remarks
There’s one important requirement that applies to all of the sites that I haven’t covered yet: Release forms. The most important requirement to know ahead of time is that you have to submit a model release form if your photos have (recognizable) people in them. You also need a property release form if the photo was taken on private property. I’m not an expert in this so I recommend researching this on your own. I think this site is a pretty good place to start learning about all of these various release forms. I think the safest bet is to always get your model to sign a release form. There are apps like Model Releaser that make it pretty convenient to collect these signatures, although I haven’t used it yet, so I don’t know how comprehensive it is. They mention that there are in-app charges, so they probably limit things like how many forms you can save and/or what type of release form is available for free.
All in all, you probably won’t make a ton of money from these sites, unless you’re a fantastic photographer who knows how to market yourself extraordinarily well. With that said, if you have a cell phone and have taken some photos, why not go back through them and see if you can sell them for (maybe) some extra cash? Personally, I’ll probably start with Shutterstock since they document their requirements really well. I’ll share details about my attempt(s) in a future post.
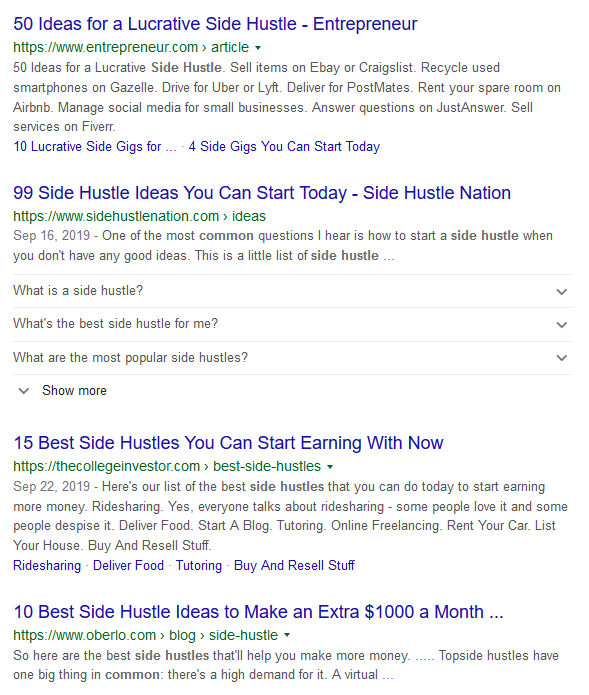
Side hustles. It’s mentioned a lot in the media, but how realistic is it to take on a side hustle? Not to mention, if you look up side hustles on Google, it seems like it’s an easy way to get exploited or scammed (see screen capture of the first page of my Google search below). At best, it’s a good way for web businesses to profit through click bait–note: maybe I should start a website about side hustles as a side hustle? I’m going to briefly cover some of the most common side hustle suggestions and my initial impressions after doing some preliminary research. I’ll narrow down which ideas seem the most attractive/realistic for me and then do a deeper dive in future posts.
After sifting through some of these websites, here are common ideas for side hustles:
Driving for Uber or Lyft or delivery for companies like Amazon, Uber Eats, Door Dash, or Postmates
Answering surveys (e.g., Mturk; Survey Junkie)
Being a virtual assistant
Blogging; Affiliated marketing; Email marketing
Teaching English or tutoring; Teach/Sell on online course or make video tutorials on YouTube
Renting out a spare room on Airbnb
Freelancing on sites like Fiverr or TaskRabbit
Get a part-time job
Write an eBook
Sell things on sites like Etsy, Ebay, Amazon, or Craigslist
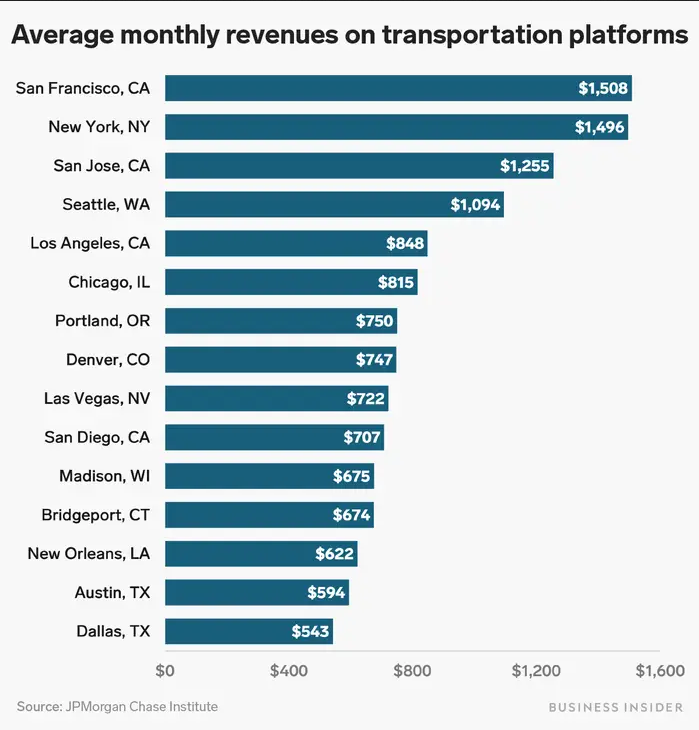
Delivery & Driving: I hate driving and admittedly, I’m not great at it either. So the less I drive, the better, for everyone’s sake. Anecdotaly, I’m pretty sure it’s possible to make a decent amount of money by driving for one of these services though. A close friend of mine does food delivery, full-time, and they love that they can control their hours and they have no problems paying their bills each month. I, on the other hand, would need to factor in the potential cost of higher than average car damage and a therapist to help me get through my rage fits in traffic. If it’s something you’re interested in, I recommend reviewing recent reports on the average earnings of drivers in your area. Business Insider, for example, just published a recent article summarizing a JP Morgan report about the average earnings of drivers in cities where Uber and Lyft drivers make the most (click the image to go to the article):
Delivering for companies like Amazon (through Amazon Flex) pay a flat rate of $18-25 per hour, which can make the compensation more consistent than food delivery.
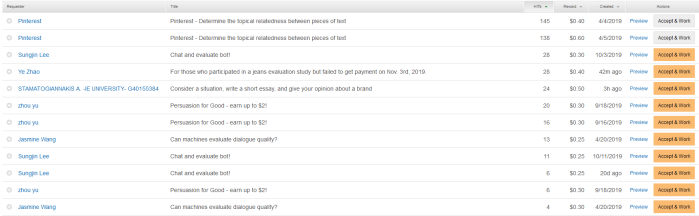
Surveys: I’m pretty skeptical of the ability to make money from these survey apps. For example, compensation on Mturk is really low:
Screen capture of postings on Mturk
Most of the surveys pay less (way) than $0.50 but they can take anywhere from 5-10 min to over an hour. If you calculate the amount of time it takes you on average to finish these surveys, you will often make much much less than the minimum wage. Plus, some of the surveys seem sketchy to me. On Mturk, sometimes you get directed to unsecure sites or the surveyor wants you to download an app on your computer or phone or both. Personally, I just don’t trust those types of surveys, so that really narrows my options.
As for options like Survey Junkie, it’s based on a point system. It’s a lot like Mturk in that you have to consistently answer surveys in order to become eligible for better paying surveys. The amount of time you spend can also vary considerably for the same amount of points–e.g., 40 points for a 5 minute survey vs. 40 points for a 20 minute survey. One hundred points is equivalent to $1. You need a minimum of 1,000 points to cash out, which generally takes about 2 months. If you’re interested in learning more, read this article. The article also provides a list of other survey sites/apps as well. If you have any personal experience with these sites/apps and are willing to share, comment below please!
Virtual Assistant (VA): I know very little about being a Virtual Assistant. Reading through some people’s experiences on Reddit, it seems difficult to juggle with a full-time job. It also seems like you have to be very well-organized and able to quickly shift tasks (example; example2). If this is something you’re interested in, you can search for virtual assistant jobs on sites like remote.co, upwork.com, and flexjobs.com.
Blogging and Affiliated marketing: Apparently, there are people out there that make money blogging. I can’t find any solid data on earned income from blogging. It seems like a vast majority make $0 to less than $100 a month from their blog (e.g., digitalnomadwannabe survey results; blogtyrant; lifehacker 2014). Although I would be ecstatic if my blogging resulted in positive cash flow, I wouldn’t necessarily recommend blogging to everyone. High quality blogs take a lot of time and effort. Additionally, the only way you’re every going to make money from it is by marketing it. You can’t make money from a blog that isn’t visible. That’s a lot of work too. With that said, I’m not completely ruling this out as a legitimate side hustle. If I somehow manage to generate income from my blog, I will absolutely share the details. I’ll probably start by researching this very detailed site about making money by blogging on WordPress. The thing that sticks out to me is the option for affiliated marketing. Sometimes this costs money and oftentimes you have to have a certain level of readership before it’s even an option. The process is very similar for email marketing, but every option I have ever seen costs money to pay for a service where you can manage your marketing campaigns (e.g., Mailchimp). In researching both affiliated marketing and email marketing, it seems like you should already have a product or service you’re trying to sell. Ideally, I would prefer to promote a product of my choice on my site (or newsletter if I had one), but of course it doesn’t work that way. There’s still a lot of potential here though and definitely something I plan on looking into. If you’re making money through your blog or have in the past, please respond in a comment!
Tutoring: I’ve head a lot about tutoring sites but there are so many out there. How do you know which ones are legit? Some of websites aren’t even fully functional, like telelanguage, or look so generic to be real like gofluent. It’s probably best to go with a reputable company for something like this, like Chegg, Magoosh, Tutorme, and skooli. I’m less sure about sites like Englishfromatoz, qkids, and landiEnglish. Some of these sites require that you have at least a Bachelor’s degree and some have a very low acceptance rate. Tutorme, for example, has less than 4% acceptance rate. In general, it seems like compensation is between $10 and $20.
Online Instructional Videos: Selling an online course seems like it has potentially high returns if you do it right, although like blogging data, I question how representative the data are for this. According to this site, you can make between $1,000 to $5,000 a month from your online course. It seems pretty time-consuming though and you have to have a skill that you can teach. You also have to market your class. The one real drawback for me is that you should probably be pretty comfortable being filmed, which I am not. Here are some tips on monetizing an online course. It’s also probably a good idea to aim for the most successful platforms (see Owler for a list of ranks and revenue by company).
Airbnb: Airbnb isn’t an option right now because I don’t have an extra room to rent out. I do have experience with listing a spare room on Airbnb though. I really enjoyed it! It’s fun meeting new people while earning some extra cash–we were ultimately net positive after Airbnb fees, cleaning expenses, and electricity. If you’re interested in this option, I recommend checking Airbnb listings in (or very close) to your neighborhood to get an idea of how much you can charge. Make sure that the listing is/would be very similar to yours. For example, do they have a private bathroom; do they have a private entryway; is there parking; do they have air conditioning; is there access to extras like a pool or fitness center; how close are they to restaurants, bars, coffee shops, public transportation, and grocery stores. Also, change the dates to see how many nights a month their room is typically booked to get an idea of how much you can make. Remember to account for fees that Airbnb charges and local taxes. Some cities also require that you register with the local/state government, which may or may not come with an additional fee.
Freelancing: After browsing through fiverr and freelancer, I’m not sure if I have a skill set that I could easily sell as a side hustle on one of these sites. The writing section looks like an option I could probably sell services for but some people are offering prices as low as $5, which definitely makes me wonder if it’s worth it. I’m also worried about the subjectivity of someone’s assessment of a product like writing and how this could affect the way I’m rated. Additionally, even if I could do something like build a website (a skill I’m trying to learn btw), how can you ensure that you deliver a product that the client is happy with? For example, what if they don’t quite know how to communicate what they’re looking for and then that misunderstanding results in something they don’t want? This option makes me nervous but I wouldn’t completely rule it out as an option. I’ve definitely been entertaining the idea of selling stock images and learning web design so I can try to build website templates.
Part-time job: It would depend on the job. I don’t hate the idea of working at a cafe or something like a plant nursery, but this is definitely the least flexible option. Unless I’m able to find a part-time job that is fully remote with flexible hours, I can easily rule this out as an option.
eBook: An ebook seems like a better option than creating an online class or freelancing because it’s less limited to certain technical skills. However, I’m sure some topics sell better than others and there may be a steeper price to this option than the others since you may need to pay to self-publish. I’d probably start with blogging first since it comes with a lower cost and requires a lot of the same skills, including identifying your audience and marketing to them, in addition to skillful writing.
Selling things: Personally, I don’t have things lying around my house that I can easily sell on Craigslist or Ebay. If I do have something to sell, it’s probably something I’m going to sell for a lot less money than what I purchased it for. So if anything, selling on sites like Craigslist or Ebay is about recuperating costs rather than earning additional income, especially because I’m also not very motivated to find things that I can purchase for cheap and resale–which is also sometimes referred to as drop shipping if you’re selling your product on sites like Amazon. There’s also the option of trying to sell something that you made on sites like Etsy, which is actually kind of complicated with their fees, sales taxes, and shipping costs. This is something I’ll write about sometime in the future because I have a product sitting in my closet that I haven’t listed on Etsy because trying to figure all of that stuff out made me want to repeatedly hit my head against my desk.
Conclusion: So that realistically leaves me with the following options: Survey apps, Freelancing, and Blogging/affiliated marketing. I’m putting online courses, tutoring, and ebooks on the back burner for now, but I haven’t completely ruled them out.
With moving, traveling, dealing with a wrecked car, and finishing my dissertation, I’ve fallen behind on blogging. I miss it and I will start again soon! In the meantime, instead of sharing my usual impersonal blog posts where I share a tutorial or give tips on teaching or policy communication, I will share some photos from my trip. Hope you enjoy!
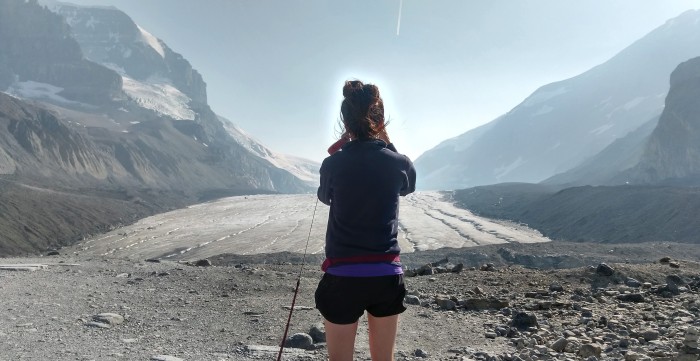
Sunrise at Glacier National Park
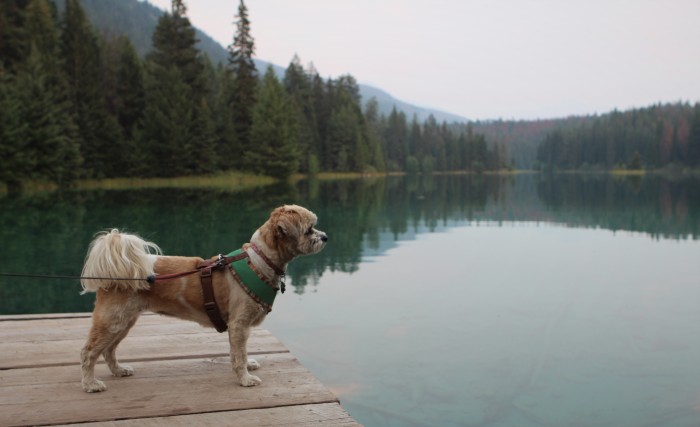
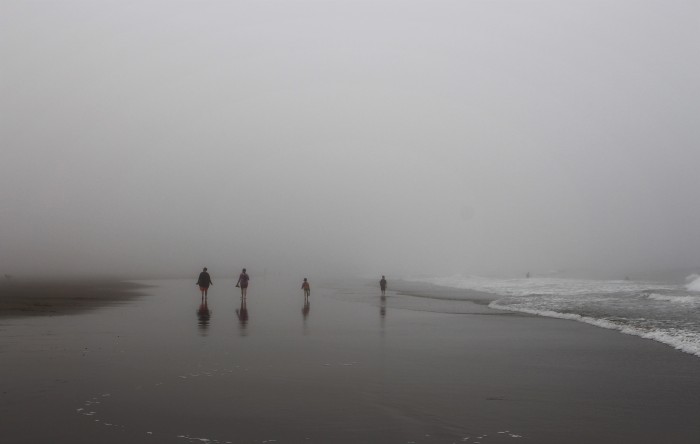
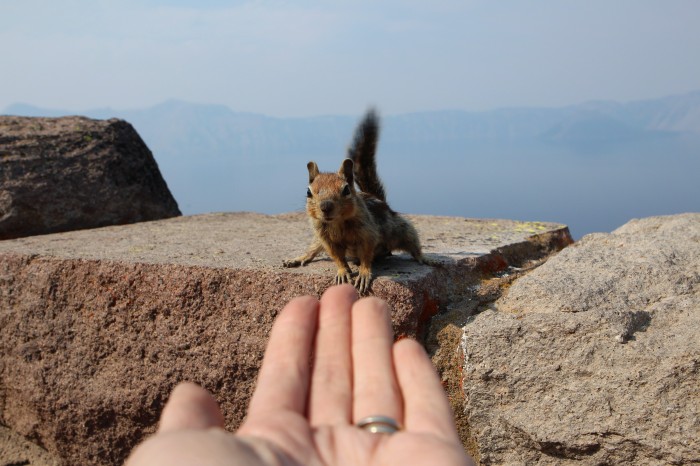
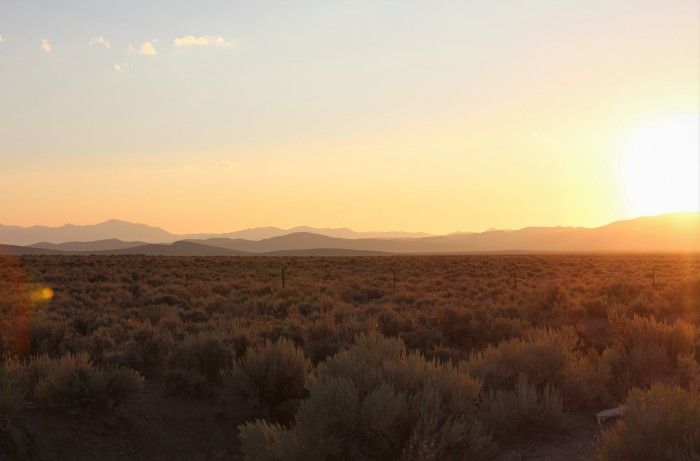
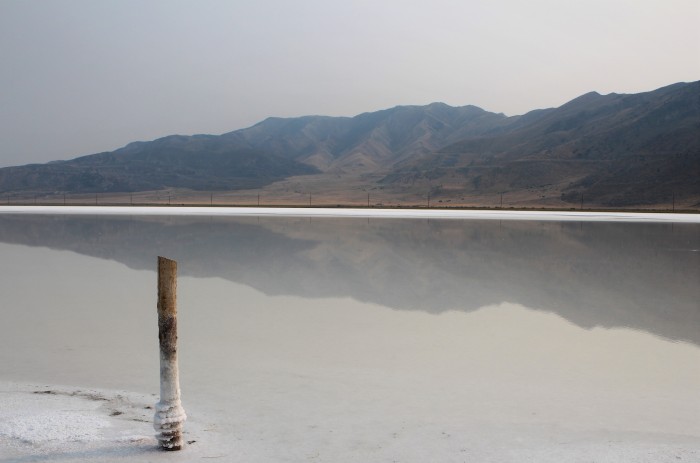
From Peter Lougheed Provincial Park in CanadaLake Louise, Banff National ParkMoraine Lake, Banff National ParkInteresting halo effect of me taking a picture of the ice fields in Jasper National Park
Near our unplanned campsite in Jasper–the road was closed because of a large car accident. Sixteen people lost their lives in Jasper that weekend…Mochi enjoying the serene lake in Jasper National ParkFoggy day on the coast of WashingtonEncounter with a banana slugMy closest encounter with a chipmunk at Crater LakeWhere the car broke down–i.e., middle of nowhere NevadaThe salt flats in Utah. The last picture before returning to Colorado.